
When you export a video from YukkuriMovieMaker4 (YMM4) without changing anything, the file comes out huge. On my PC, a 66-second video became a file of about 2 GB. The reason is the video bitrate: when it is set to 「自動」 (Auto), YMM4 exports at 240,000 kbps (240 Mbps).
So I exported two kinds of video — an “explainer” with a still background, and a “let’s play” with gameplay footage behind the characters — with different settings, twelve exports in all, and compared the file size, the export time, the actual bitrate, and the picture quality. The short answer: just switching the video bitrate to 「手動」 (Manual) takes the file from about 2 GB down to somewhere between 10 and 250 MB. Which setting is best turned out to depend on how much the video moves.
YMM4 is a free Japanese video editor for “Yukkuri” videos, and its interface is Japanese only. As in my YMM4 install guide, I show each label as it appears on screen, followed by an English translation — for example, 「動画出力」 (Export Video). The official manual is in Japanese too, and its page on exporting is only three lines long, so this article covers what the export window actually does.
This article reflects YMM4 as of November 2026. YMM4 is updated often, so the labels and default values may differ in later versions.
[ Reference ] My setup
| Item | Details |
|---|---|
| YMM4 | v4.57.0.1 |
| OS | Windows 11 |
| CPU / GPU | Core i5-14600KF / GeForce RTX 5070 |
| Video A (explainer style) | 1920×1080, 60 fps, about 66 seconds (3,987 frames): one background image with Yukkuri Reimu and Marisa character art and their dialogue. Only the characters’ mouths and eyes move |
| Video B (let’s play style) | Video A with the background replaced by gameplay footage (Crimson Desert): a high-motion scene of riding a horse through grass and rocks |
| How I measured | File size and time from the files themselves; bitrate and encoder with ffprobe |
These are the two main styles of Yukkuri videos in Japan: 解説 (kaisetsu, explainers), where the characters talk over still images, and 実況 (jikkyō, let’s plays), where they comment over gameplay footage.
Recommended settings (the short version)
As a rough guide, here is what each setting gives you in file size and picture quality. The file sizes are for a 66-second video.
| Video bitrate setting | Explainer style (still background) | Let’s play style (gameplay background) |
|---|---|---|
| 「自動」 (Auto, the default) | About 1,995 MB. The baseline | About 2,025 MB. The baseline |
| 「手動」 (Manual) + 「映像品質」 (Video quality), 55.0 (the default) | About 10 MB. Indistinguishable from Auto | About 254 MB. The closest to Auto |
| 「手動」 (Manual) + 「固定ビットレート」 (Constant bitrate), 12000 kbps | About 101 MB. Indistinguishable from Auto | About 101 MB. In a paused frame, fine detail in grass and rocks is slightly soft |
| 「手動」 (Manual) + 「固定ビットレート」 (Constant bitrate), 8000 kbps | About 67 MB. Indistinguishable from Auto | About 67 MB. The softness in fine detail is noticeable |
| 「手動」 (Manual) + 「固定ビットレート」 (Constant bitrate), 4000 kbps | (Not tested) | About 34 MB. Grass and stone textures are smeared and blurry |
- If in doubt, use 「手動」 (Manual) + 「映像品質」 (Video quality) at 55.0. The file size follows the content — small for low-motion video, larger for high-motion video — and the picture stayed close to Auto for both styles
- Use 「固定ビットレート」 (Constant bitrate) when you want to decide the file size in advance. The size is roughly “bitrate × length,” whatever the content
- For the explainer style (still background), every setting looked the same. Video quality 55.0 is enough if you want a small file
- For the let’s play style (gameplay background) with a constant bitrate, the fine detail gets softer the further you go below 12000 kbps
- The other options — export method 「FFmpeg 出力」 (FFmpeg output) and 「ハードウェアエンコード」 (Hardware encoding) on — worked fine at their defaults
- 12,000 kbps is what YouTube Help recommends for 1080p at 60 fps (SDR) in “YouTube recommended upload encoding settings”. For 30 fps, it recommends 8,000 kbps (checked on November 12, 2026)
- I would leave hardware encoding on. On my PC, turning it off meant the bitrate I typed in was ignored (details below)
Why the file is so large with “Auto”
When you open the export window, the video bitrate is set to 「自動」 (Auto), and the box on the right shows 240000 kbps, grayed out. The 「プレビュー」 (Preview) line below it reads -b:v 240000000, and ffprobe confirmed that the exported file really was 240,000 kbps.
Bitrate is the amount of data used per second, so the size of a video file is roughly “bitrate × length.” With a constant bitrate, that is true even when the picture hardly changes.
Using this formula, here is what to expect for longer videos. These are calculated values — the only length I actually exported was 66 seconds — and they do not include the audio.
| Video length | Auto (240,000 kbps) | 12,000 kbps | 8,000 kbps |
|---|---|---|---|
| 1 minute | About 1.8 GB | About 90 MB | About 60 MB |
| 10 minutes | About 18 GB | About 900 MB | About 600 MB |
| 30 minutes | About 54 GB | About 2.7 GB | About 1.8 GB |
The 240,000 kbps figure is for this project’s settings (1920×1080, 60 fps). I have not checked what “Auto” gives for other resolutions or frame rates, but you can always read the number from the Preview line in the export window.
How to change the video bitrate
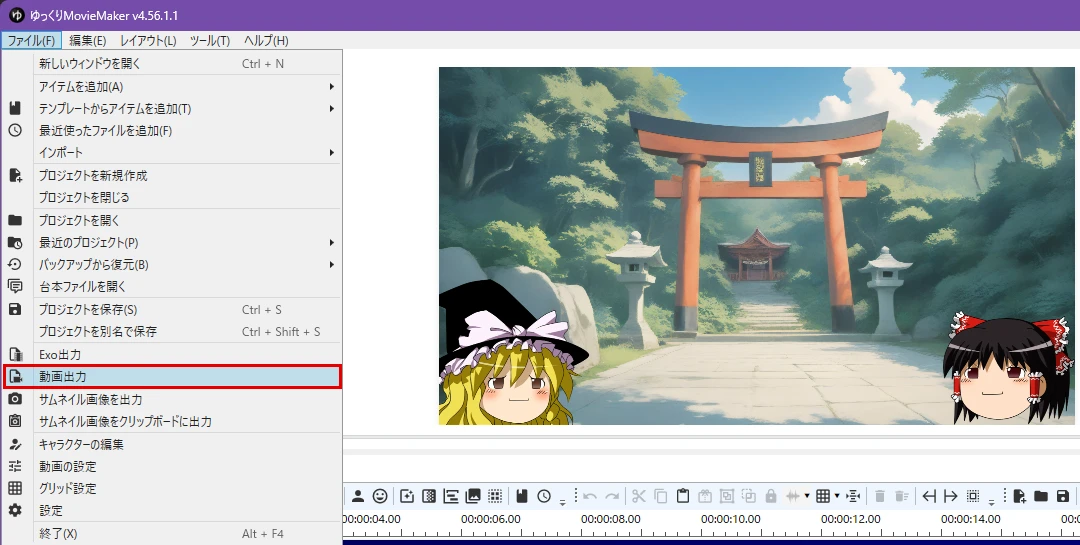
- Open the export window from the menu: 「ファイル」 (File) → 「動画出力」 (Export Video)
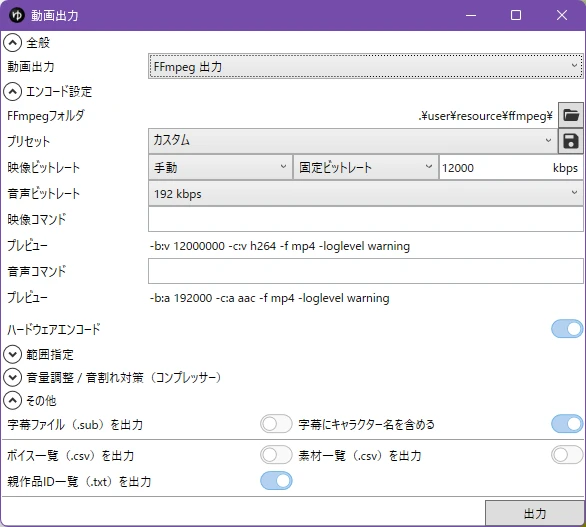
- Next to 「映像ビットレート」 (Video bitrate), change the first drop-down from 「自動」 (Auto) to 「手動」 (Manual). The three choices are 「自動」 (Auto), 「手動」 (Manual), and 「指定しない」 (Don’t specify)
- Check that the second drop-down says 「固定ビットレート」 (Constant bitrate), then type 12000 into the box to its right (the unit is kbps)
- Check that the 「プレビュー」 (Preview) line now reads
-b:v 12000000, click 「出力」 (Export) at the bottom right, and choose where to save the file
When the export finishes, the export window closes by itself. The settings I changed were still there the next time I opened it, so there was no need to enter them again.
Results for the explainer style: seven exports
First, I exported video A (still background, about 66 seconds), changing one setting at a time. Anything not mentioned was left at its default.
| Setting | File size | Actual video bitrate | Export time | Encoder |
|---|---|---|---|---|
| 1. Auto (default) | About 1,995 MB | 240,000 kbps | About 15 s | h264_nvenc |
| 2. Manual, constant bitrate 12000 | About 101 MB | 11,964 kbps | About 11 s | h264_nvenc |
| 3. Manual, constant bitrate 8000 | About 67 MB | 7,976 kbps | About 10 s | h264_nvenc |
| 4. Manual, video quality 55.0 | About 10 MB | 1,083 kbps | About 10 s | h264_nvenc |
| 5. Same as 2, hardware encoding off | About 2.6 MB | 177 kbps | About 12 s | libopenh264 |
| 6. MediaFoundation output (defaults) | About 35 MB | 4,079 kbps | About 26 s | MediaFoundation (H.264) |
| 7. Preset “MP4 / AV1+AAC” at 12000 | About 101 MB | 11,968 kbps | About 11 s | av1_nvenc |
- All seven exports finished without errors, and every file was 1920×1080, 60 fps, 3,987 frames
- With 「固定ビットレート」 (Constant bitrate), the file had the bitrate I typed in (rows 2, 3, and 7)
- For a 66-second video, every export took 10 to 15 seconds, except MediaFoundation output at about 26 seconds
- Playing the seven files side by side, I could not see any difference in the picture. For a low-motion Yukkuri video, settings in this range do not seem to change what you see
- The audio bitrate was left at 「192 kbps」 for all of them, but the audio in all seven files measured about 130 kbps (AAC)
For reference, I also measured how close each file is to row 1 with SSIM (the closer to 1, the more similar): row 2 scored 0.998, row 3 0.997, row 4 0.992, row 5 0.969, row 6 0.989, and row 7 0.997. Because the video has so little motion, all the scores are on the high side. By the numbers, row 5 (hardware encoding off) is the lowest, followed by row 6 (MediaFoundation output).
With hardware encoding off, the bitrate setting was ignored
When I turned 「ハードウェアエンコード」 (Hardware encoding) off and exported at 12000 kbps (row 5), the file came out at 177 kbps and about 2.6 MB. The Preview line still said -b:v 12000000, and there was no error message.
The files themselves show which encoder was used: the GPU encoder (h264_nvenc) when the option was on, and a software encoder (libopenh264) when it was off. The software-encoded file also used the Constrained Baseline H.264 profile and had the lowest SSIM score of the seven. I could not see the difference by eye, but the export time was almost the same, so on my PC there was no reason to turn it off.
My PC has an NVIDIA GPU. I have not tested other GPUs, or a PC without one.
With “Video quality,” the content decides the file size
If you change the second drop-down from 「固定ビットレート」 (Constant bitrate) to 「映像品質」 (Video quality), the kbps box turns into a slider. Its default value is 55.0, and the Preview line becomes -crf:v 23.
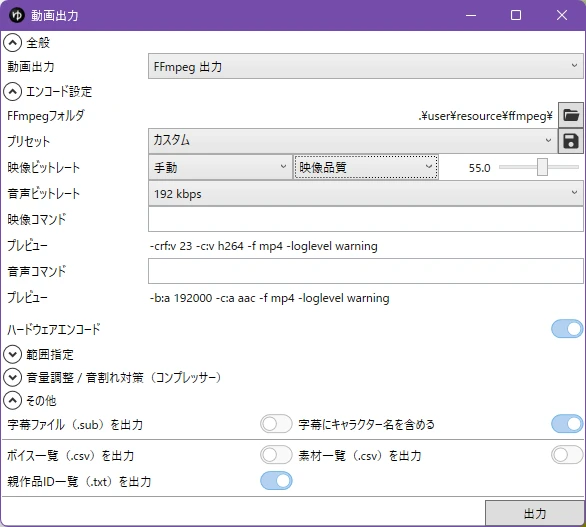
Instead of fixing the bitrate, this mode fixes the quality and uses as much data as it needs. Video A hardly moves, so the result was very small: 1,083 kbps and about 10 MB. At the same 55.0, the high-motion video B came to about 254 MB (see the next section).
MediaFoundation output took longer
Changing the 「動画出力」 (Export method) drop-down from 「FFmpeg 出力」 (FFmpeg output) to 「MediaFoundation出力」 (MediaFoundation output) swaps the settings for a different set, including a 「詳細設定」 (Advanced settings) section with options such as the H.264 profile and encoding speed. (Media Foundation is the video framework built into Windows.)
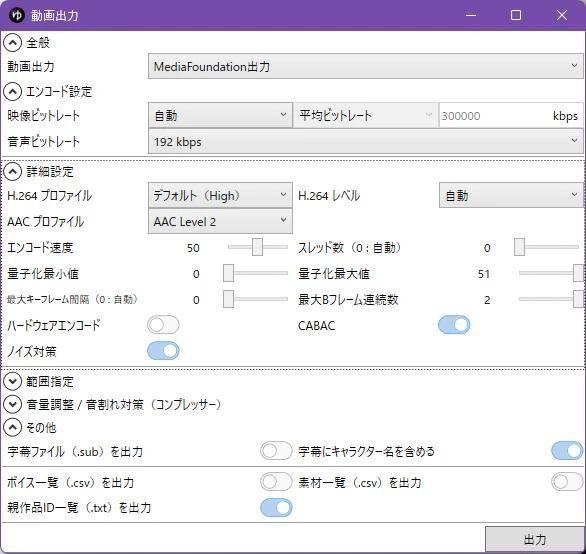
With everything at its default, the export took about 26 seconds, and the file was about 35 MB (4,079 kbps). The video bitrate was on 「自動」 (Auto) with 300000 kbps shown grayed out, but the file was nowhere near that large. Hardware encoding is off by default for this method.
The official FAQ suggests using 「FFmpeg 出力」 (FFmpeg output) when an export fails, and it is also the default, so I see no need to switch in normal use.
The AV1 preset: same bitrate, same file size
Choosing 「MP4 / AV1+AAC」 from the 「プリセット」 (Preset) drop-down fills the 「映像コマンド」 (Video command) box with -c:v libsvtav1 -f mp4 and switches the video codec to AV1. Exported at 12000 kbps, the file was about 101 MB — the same as the H.264 file in row 2, which is what you would expect at the same bitrate. The encoder recorded in the file was av1_nvenc, so hardware encoding was used here too.
YouTube Help recommends H.264 as the video codec, so for YouTube I would stay with the default H.264.
Results for the let’s play style: five exports
Next, I exported video B (gameplay background) with FFmpeg output and hardware encoding on, changing only the video bitrate. SSIM is measured against the Auto file (the closer to 1, the more similar).
| Setting | File size | Actual video bitrate | Export time | SSIM |
|---|---|---|---|---|
| Auto (default) | About 2,025 MB | 243,656 kbps | About 14 s | (baseline) |
| Manual, video quality 55.0 | About 254 MB | 30,478 kbps | About 13 s | 0.977 |
| Manual, constant bitrate 12000 | About 101 MB | 11,985 kbps | About 12 s | 0.944 |
| Manual, constant bitrate 8000 | About 67 MB | 7,983 kbps | About 12 s | 0.921 |
| Manual, constant bitrate 4000 | About 34 MB | 3,993 kbps | About 12 s | 0.861 |
- With a constant bitrate, the file sizes were almost the same as for video A (about 101 MB at 12000, about 67 MB at 8000). The size does not change with the content — the quality does
- Video quality 55.0 came to about 254 MB, against about 10 MB for video A (roughly 25 times larger). It uses as much data as it needs, so the picture stays the closest to Auto
- The exports took about 12 to 14 seconds, only a second or two longer than for video A
The image below shows the same spot in the same frame (around the 45-second mark) from each file, cropped at full size.
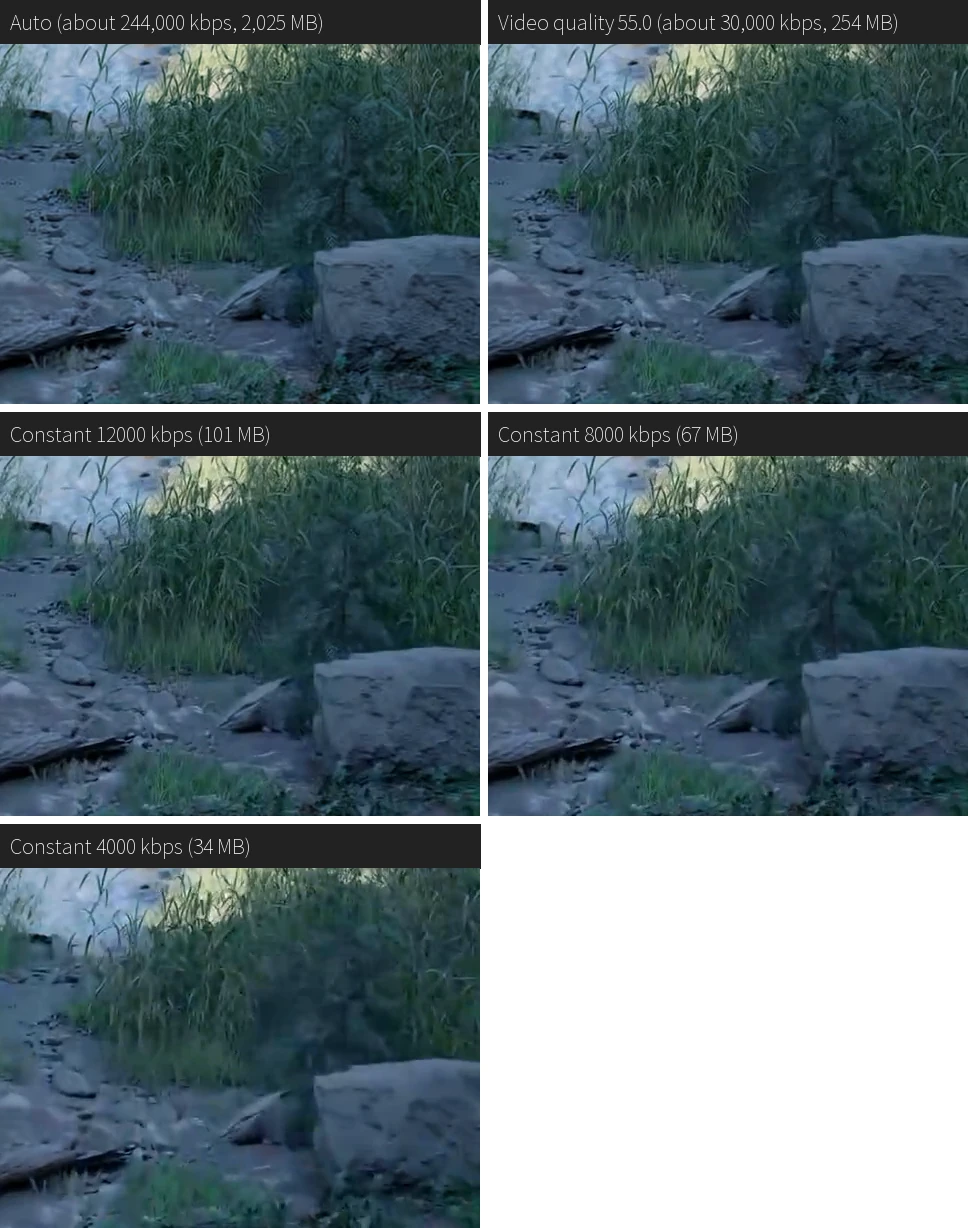
Scenes where fine texture such as grass and gravel moves across the whole frame are the hardest case for a video encoder. At 4000 kbps the texture is clearly smeared, and it gets closer to Auto as you go up to 8000 and 12000 kbps. In the crops, video quality 55.0 was almost indistinguishable from Auto.
If you upload to YouTube, YouTube encodes the video again, so it helps to upload a file that still has its fine detail. YouTube recommends 12,000 kbps for 1080p at 60 fps, but for a high-motion let’s play video, exporting at video quality 55.0 (about 30,000 kbps in my test) looks like a good option too.
Here is the 12000 kbps export of video B, uploaded to YouTube as an unlisted video. YouTube has encoded it again, so it does not look exactly like the crops above. (The dialogue is in Japanese and is not about the game.)
Other options in the export window
Here are the other options, as far as I could confirm them on screen. The official manual does not describe them, so the English names are my own translations.
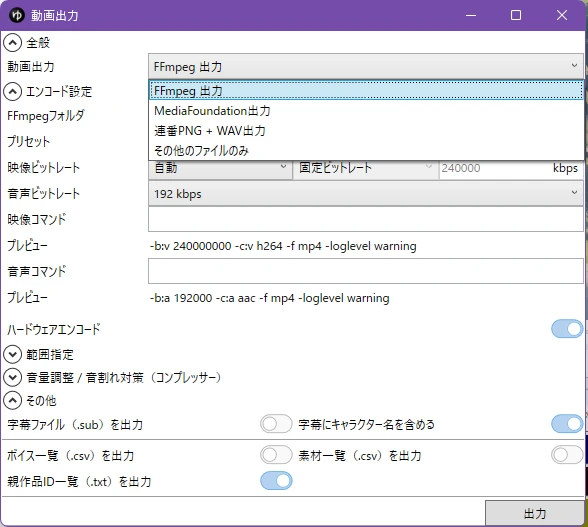
The export methods
| Japanese label | English | What it does |
|---|---|---|
| FFmpeg 出力 | FFmpeg output | The default. Exports with the FFmpeg bundled with YMM4 (rows 1–5 and 7 above) |
| MediaFoundation出力 | MediaFoundation output | Exports with Windows’ own video framework (row 6 above) |
| 連番PNG + WAV出力 | PNG sequence + WAV output | Judging by the name, exports numbered PNG images plus a WAV audio file (not tested) |
| その他のファイルのみ | Other files only | Judging by the name, outputs only the extra files listed under 「その他」 (Other) below (not tested) |
Presets
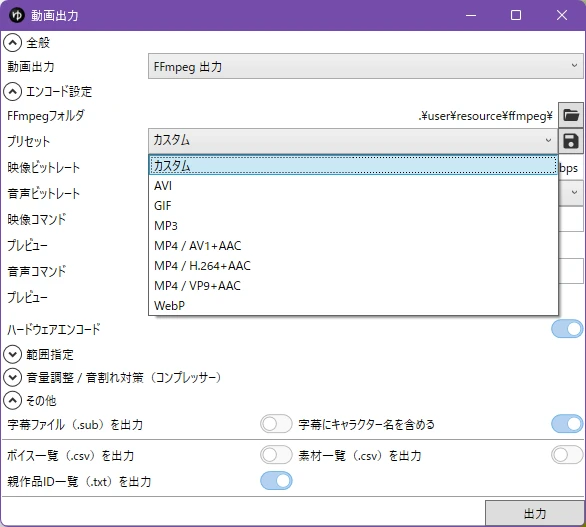
There are eight presets: 「カスタム」 (Custom), AVI, GIF, MP3, MP4 / AV1+AAC, MP4 / H.264+AAC, MP4 / VP9+AAC, and WebP. Choosing one fills the 「映像コマンド」 (Video command) and 「音声コマンド」 (Audio command) boxes with FFmpeg options. When I switched back to 「カスタム」 (Custom), the old values stayed in the command boxes, so clear them by hand to get back to the default. The only presets I tried were Custom (the default) and MP4 / AV1+AAC.
Range, volume, and other options
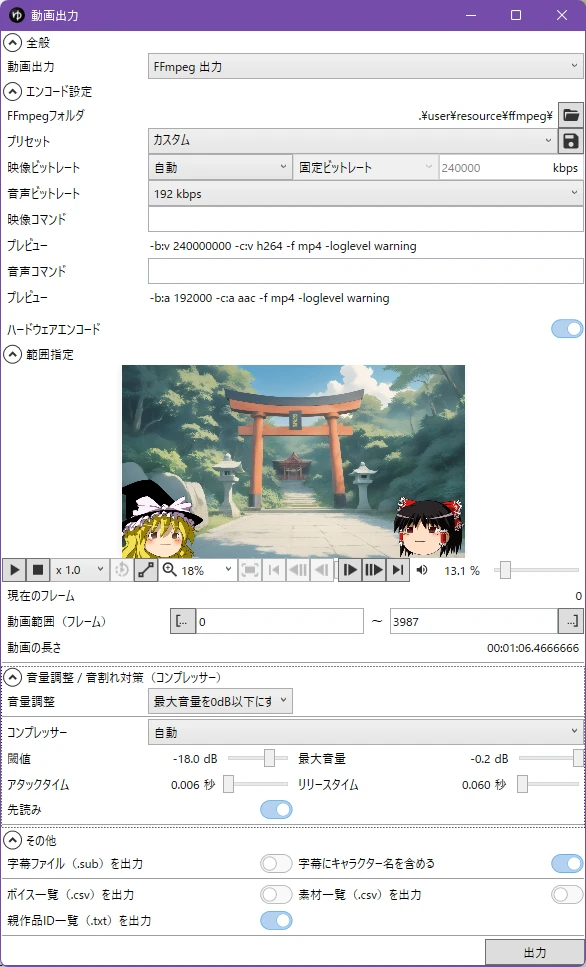
- 「範囲指定」 (Range): sets which frames to export. The default is the whole video (0 to 3987 in my case)
- 「音量調整」 (Volume adjustment): the default is 「最大音量を0dB以下にする」 (Keep the peak volume at or below 0 dB), with the compressor on 「自動」 (Auto). This is why the export starts with a 「音量チェック中」 (Checking volume) step
- 「音声ビットレート」 (Audio bitrate): from 32 to 576 kbps, or 「指定しない」 (Don’t specify). The default is 192 kbps
- 「その他」 (Other): switches for extra files to output alongside the video — a subtitle file (.sub), a list of voices (.csv), a list of assets (.csv), and a list of parent work IDs (.txt). Only the last one is on by default
That last option needs some Japanese context. On Niconico, a Japanese video site, creators are expected to register the works they used — software, character art, music — as “parent works” (親作品) of their video, so that credit flows back to the original creators. With the option on, YMM4 writes a small text file next to your video, named after the video with 「 – 親作品一覧.txt」 (parent work list) at the end. In my test it contained one line, nc236011, which is the ID of YMM4 itself. If you only upload to YouTube, you can ignore the file or turn the option off.
If the export fails
All twelve of my exports worked, so I have no troubleshooting of my own to share. For exports that stop partway or produce a garbled picture, see the official FAQ entry 「動画の出力に失敗する」 (Video export fails) (Japanese). It suggests using FFmpeg output and changing the hardware decoding setting, among other things.
If you have not set up YMM4 yet, start with my guide to installing and using YMM4, which goes from the download to talking, lip-syncing characters.
Summary
- With the video bitrate on 「自動」 (Auto), YMM4 exported at about 240,000 kbps, and a 66-second video came to about 2 GB (at 1920×1080, 60 fps)
- 「手動」 (Manual) + 「映像品質」 (Video quality) at 55.0 lets the content decide the size: about 10 MB for a still-background video, about 254 MB with gameplay footage behind it. The picture stayed close to Auto in both
- 「手動」 (Manual) + 「固定ビットレート」 (Constant bitrate) fixes the size whatever the content: roughly “video bitrate (kbps) × seconds ÷ 8000” MB
- For the still-background video, I could not see any difference between the settings
- For the gameplay-background video, fine detail got blurrier as the constant bitrate went down, and it was obvious at 4000 kbps
- With hardware encoding off, the bitrate I entered was ignored on my PC, so I would leave it on
- Exporting a 66-second video took 10 to 15 seconds with FFmpeg output
The exports and measurements for this article were carried out with the help of Claude (an AI), and I reviewed the results.